This guide will help you get the Mixpanel module installed and configured.
Step 1: Install the Mixpanel module
First, you must install the Mixpanel module in the normal Drupal way.
Step 2: Sign-up for an account on Mixpanel.com
Sign-up for a free account on Mixpanel.com and follow all the instructions.
Step 3: Obtain your Mixpanel token
After signing up, you'll be given some Javascript code to copy into your site. The Mixpanel module can't use this code directly - instead it just needs the token out of it.
The line will look something like this:
mixpanel.init("88f10be4520d363131e204f7f25e9f0e");</script><!-- end Mixpanel -->The 88f10be4520d363131e204f7f25e9f0e will be different for you - that is your token!
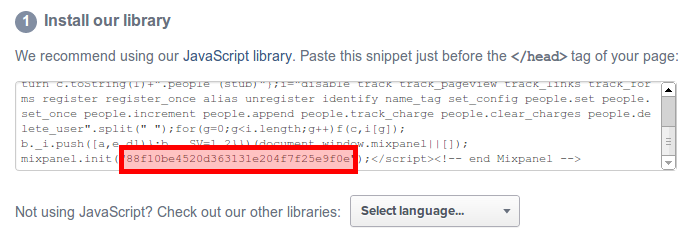
As of this writing (2013-09-23), clicking in the text box with the Javascript code will cause the whole thing to become selected. So, you won't be able to select just the token and copy it.
I recommend copying the whole thing into a text editor (like Notepad) first, and then copying the token out.
Step 4: Save your Mixpanel token in the Mixpanel module settings
Go to: Configuration -> Web services -> Mixpanel
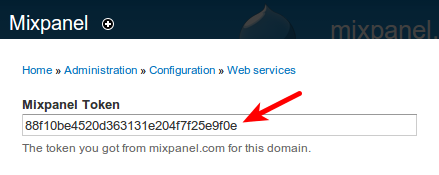
Copy/paste your Mixpanel token (which you got via the previous step) into the first field and click "Save configuration".
Now your Drupal site is ready to start sending events to Mixpanel!
Step 5: Send some events to Mixpanel
The quickest way to start sending events to Mixpanel, is to simply enable the Mixpanel defaults module. It will send events for:
- Joining and leaving a group (in Organic groups)
- Creating, deleting, updating a user
- User login and logout
- Creating, updating, and deleting a node
- Creating a comment
However, the only way to get really powerful insights into how users are using your application is by sending your own custom events!
You can do this in one of two ways:
(Click one of the above links to see the full documentation on how to do that!)
| Attachment | Size |
|---|---|
| Selection_013.png | 26.32 KB |
| Selection_014.png | 15.02 KB |